Using the calendar view
Using the calendar view
In the previous sections, we saw how to schedule consults from the patient profile. An alternate way to schedule consults is from the calendar view. To get to the calendar view, on the Calendar icon in the top right corner of any page.

This will load the calendar view. We will go over the calendar view in more detail in an upcoming section, so we will focus here on how to book a consult in the calendar view.

Before booking a consult, you need to select a patient. You can either:
- Add a new patient by clicking on Add patient (#1 in the image above);
- Or use the search bar (#2 in the image above) to select an existing patient.
Once a patient is selected, click on the time slot on the calendar that corresponds to the start time of the consult. In the image above, if we wish to book a consult for Wednesday, May 12 at 11 a.m., we need to click on the area marked with the red box (#3). This will open a pop-up form that will allow us to create a standalone consult or a consult under a clinical case:

Once a patient is booked, you can drag and drop appointments to change their start time. This feature is disabled by default but you can enable it from the calendar (more info below).
Additional calendar features
This help article outlines additional calendar features you can take advantage of:
- Calendar masking;
- Displaying cancelled consults on the calendar
- Calendar booking internal notes;
- Booked by the patient using online booking.
- Adding general notes
Some of the features listed above are controlled from the top bar on the calendar:

Calendar masking
If you find yourself in a busy clinic and would like to quickly and easily hide your appointments from curious eyes in order to protect your patients' privacy, you can choose to Mask (and unmask) the information in your calendar by clicking on the eye icon in the top bar (icon #1 in the image above).
Below you can see what this looks like in a calendar:
Displaying cancelled consults on the calendar
By default, cancelled consults are not displayed on the calendars. If you would like to display the cancelled consults on the calendar, click on the cancelled consults icon in the top bar (icon #2 in the image above).
Calendar booking internal notes
You can add internal notes to any consult in your calendar.
To add notes, click on a booking, and then on Internal notes:

Add desired notes to the Internal notes textbox and click, Submit.

Your notes will now be saved on the calendar booking:

Booked by the patient using online booking
You can see when a patient has booked themselves using online booking.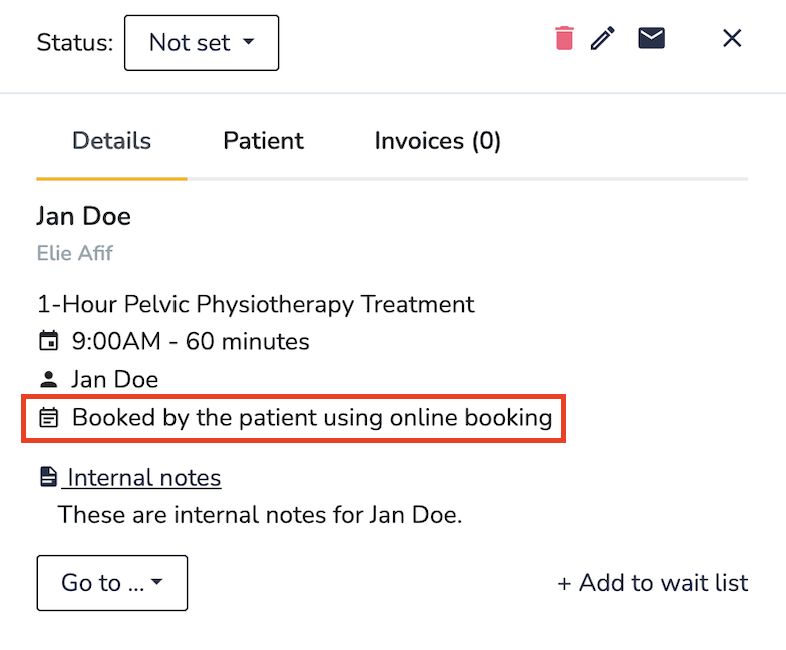
Adding general notes
You can use the "all-day" section of the calendar to add general notes (such as simple reminders, tasks, etc..) for practitioners on certain dates. These notes are not shared with patients and do not affect the schedule availability.

Drag-and-drop calendar appointments to change their start time
Once you have booked a patient into your calendar, you can change the appointment time using the drag-and-drop feature.
This feature is disabled by default but you can enable it from the calendar.
After dropping the booking you will be prompted to fill in the Edit consult pop-up confirming the new booking start time (#1 in the image below).

By default, if you change the start time or the duration of the consult, Embodia will automatically email all participants to inform them about the change. If you would like to skip sending this email, check the checkbox beside Skip sending an email to all participants if the start time or the duration of the consult changed (#2 in the image above).
Click Submit to confirm the new appointment time.
You will then see one of the following two banners appear on your screen confirming the successful booking change:


Calendar settings
From the calendar view, you can set up your calendar to your liking. Changing these settings only changes the way that your calendar looks to you (i.e.: it does not change how a patient views your calendar/availability if you are using the online booking feature).
Go to your calendar:

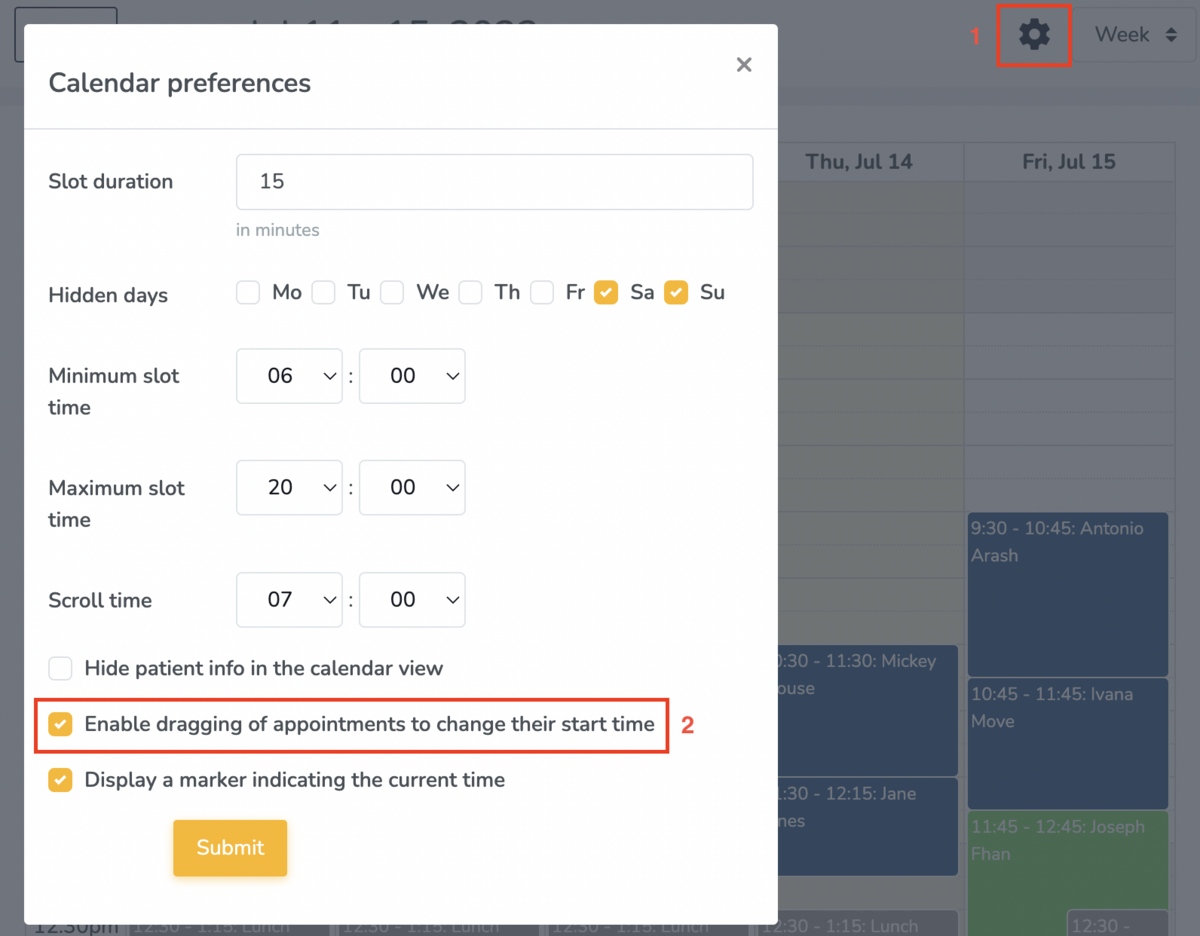
Click on the Settings gear icon:

You will be presented with numerous options:

Here's an outline of each settings feature available in the calendar:
Slot duration: this will determine how many 'slots' you see in your calendar view. If you select 30 minutes, you will have one slot every 30 minutes like this:

Slot minimum width (in pixels): This will affect the width of each time slot. If not specified, the time slot will be made as small as possible to fit the full calendar into the view. If specified and the full width of the calendar is larger than the view, horizontal scrolling will be enabled.
Hidden days: hide certain days of the week. For example, if you don't work Saturday and Sunday, you can select to hide those days on your calendar view.
Minimum slot time: indicate the first time you want to be displayed in your calendar. For example, if you enter 7 a.m. (as shown in the example above), your calendar will begin at 7 a.m.
Maximum slot time: indicate the last time you want to be displayed in your calendar.
Scroll time: If the calendar view is larger than the height of your screen, you will have to scroll up or down to view the remaining calendar. The "Scroll time" determines how far forward the scroll pane is initially scrolled when the calendar is loaded or when you change dates.
Say for example you have the minimum slot time to be 7 a.m. and you set the scroll time to be 9 a.m. When you load the calendar, the calendar will display the 9 a.m. slot at the top of the page and you will have to scroll up to view the schedule for 7 and 8 a.m.
Hide patient info in the calendar view: if there is a chance that patients could see your calendar (for example, if you work in an open clinic space), you can check this box so that the patient name and information are hidden on the calendar view.
Show the service name in the calendar view: if you would like to see the name of the service in the calendar without having to click on the appointment, check this box.
Enable dragging of appointments to change their start time
Show indication of invoices status: show if an invoice has been generated for the consult, and if so, if it is balanced.
Show indication of charts status: show if a chart has been created for the consult, and if it is signed.
Show warning of incomplete questionnaires and/or consent forms: show if there are incomplete questionnaires and/or consent forms.
Display a marker indicating the current time: you can choose to have a marker display the current time on your calendar. Here's an example of what that looks like (the red arrow is pointing to the display marker):
